Windows 10 may be the latest and greatest Windows today but that’s only because Microsoft gave up on Windows 7 a long, long time ago. If you look back though, Windows 7 was the best Windows release ever. The Aero Shake feature has been there since Windows 7 and you can enable or disable it on Windows 10 using three methods.
Even today, with Microsoft vehemently pushing users to Windows 10, there are millions of active Windows 7 devices. By February 2018, Windows 7 still had 41.86 percent of the Windows market share. In comparison, Windows 10 had 42.78 percent of the market. Keep in mind Windows 7 was released almost a decade ago. For 2009, it looked pretty modern with the aero-glass design. One of the many features it brought to the table was Aero Shake.
Aero Shake
As a general rule of thumb, any feature that starts with Aero was more likely than not introduced with Windows 7. A lot of the Windows 7 goodness still exists with Windows 10 and Aero shake is one of those. It is, however, not that much of a goodness for some users. What Aero Shake essentially does is that it lets users quickly minimize all open windows except the currently active window by shaking the currently active window. This can also be done by pressing the Win+Home keys on the keyboard. Sometimes though you can accidentally shake a window or maybe you’re just quickly moving it around trying to place it and an aero shake happens. I’ve never accidentally triggered Aero shake but some users have and as such aren’t big fans.
Back when things used to be a bit more complicated, users had the option to enable or disable aero shake. Microsoft seems to have completely forgotten about aero shake though since the Windows 10 Settings app has no option to enable or disable it. It is enabled by default with no way to disable it. No official way to disable it, that is. There are certainly workarounds to it. If for some reason, Aero Shake does not work on your PC and you want it, you can even enable it.
Don’t miss: Move Taskbar Icons to Center on Windows 10
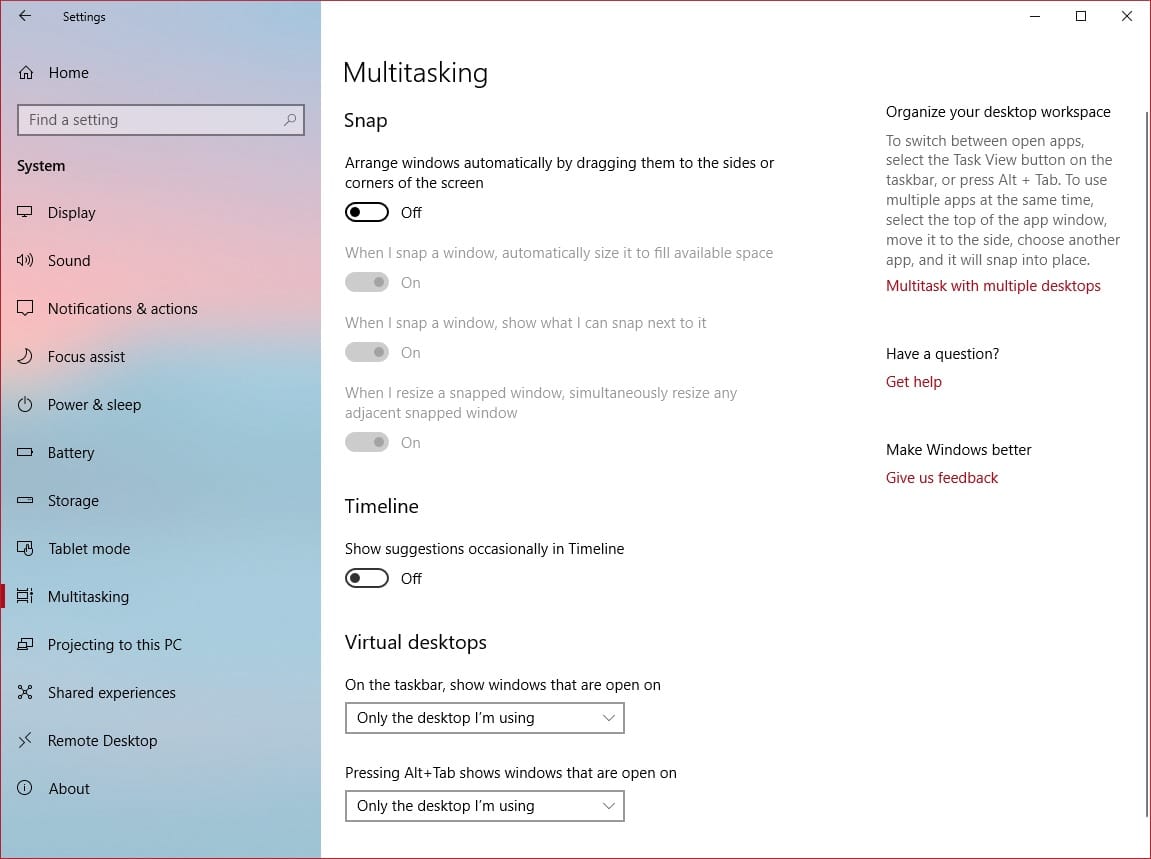
Enable or disable Aero Shake on Windows 10 – Settings
- Launch the Windows 10 Settings app and navigate to System > Multitasking.
- On the right side, you’ll see a toggle at the top labeled Arrange windows automatically by dragging them to sides of corners of the screen under the heading Snap. You can simply toggle this off to disable Aero Shake and toggle it on to enable it. Keep in mind this also disables the Window-snapping feature. Currently, there’s no other official way of disabling Aero Shake.

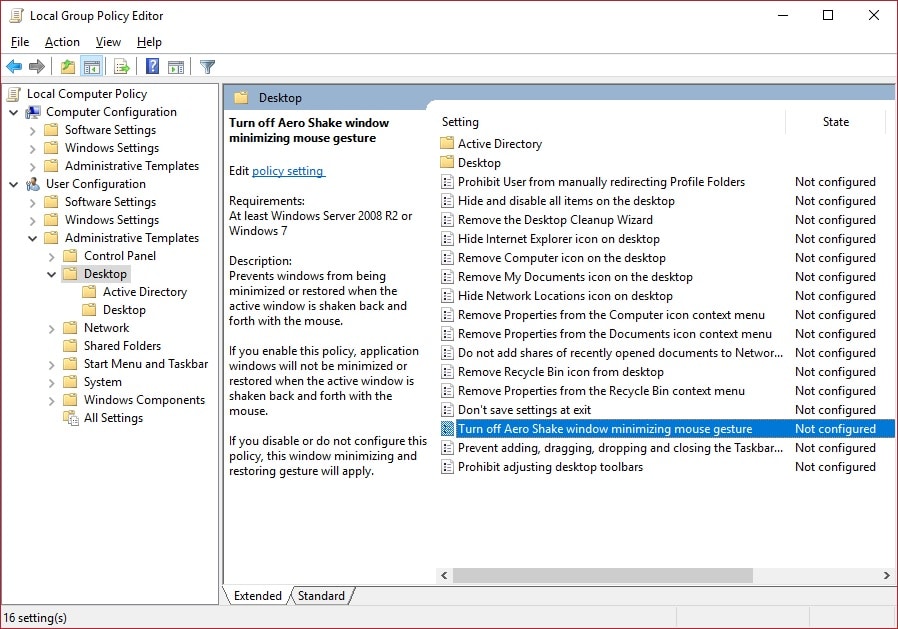
Enable or disable Aero Shake – Group Policy
Note: Group Policy Editor is not available on Windows 10 Home.
- Launch Group Policy Editor. You can search for Group Policy Editor and select Edit group policy from the search results to launch it. It can also be searched for by typing gpedit in the Windows 10 search.
- In the Group Policy Editor, navigate to User Configuration > Administrative Templates > Desktop from the navigation pane on the left.

- Double-click on Turn off Aero Shake window minimizing mouse gesture policy.

- In the new Windows that pops up, select Enabled and click Apply. Close all the Windows when you’re done. Aero shake should be disabled now. In case you want to enable it, simply go back and select Disable and click Apply.

Suggested reading: 5 Reasons Why Windows is Better Than Linux
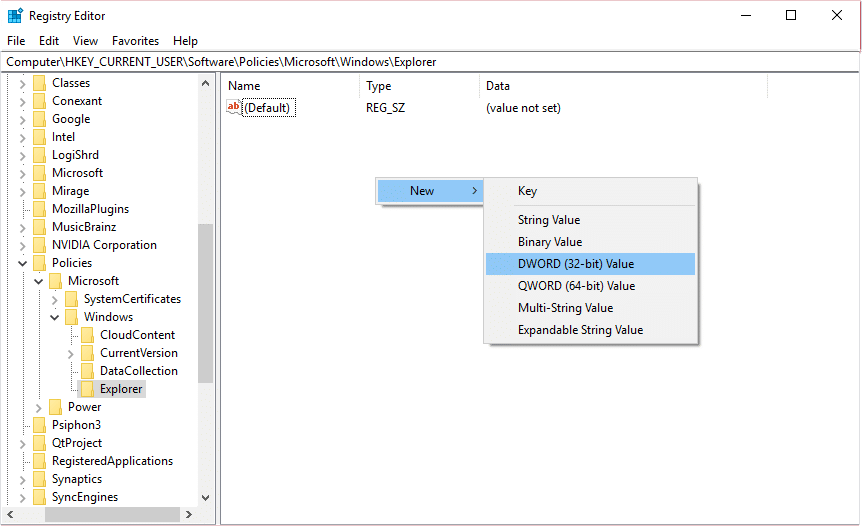
Enable or disable Aero Shake – Registry Editor
- Launch the Registry editor. As before, you can search for it in the Windows 10 search by typing regedit or Registry editor.
- Navigate to the following location. You can do this manually from the navigation pane on the left or simply copy and paste the following location into the address bar at the top.
Computer\HKEY_CURRENT_USER\Software\Policies\Microsoft\Windows\Explorer
- Double-click on NoWindowMinimizingShortcuts DWORD value and then change its value to 1 to disable Aero Shake and set the value to 0 to enable it. It’s quite possible that you don’t find the NoWindowMinimizingShortcuts DWORD value or even the Explorer key. In that case, you’ll have to manually create them.
- To create the Explorer key, right-click on the Windows key in the navigation pane, select New > Key, and name it Explorer.
- To create the NoWindowMinimizingShortcuts DWORD value, select Explorer on the left and then right-click an empty area on the right side, select New > DWORD value (32-bit) and name it NoWindowMinimizingShortcuts.

- Once you’ve created it, follow the 3rd step and you should be able to easily disable aero shake.
Have you ever tried Ubuntu on your Windows PC? You can enjoy Ubuntu on Windows 10 via dual boot by following our tutorial.